AI Flash vs Manual Brightness Adjustment: Which Is Better for Photo Editing? (2026 Comparison)
Making a photo brighter sounds simple, but choosing the right editing method can make a huge difference in the final result. Many people assume that increasing brightness and using an AI-powered lighting tool produce the same outcome. In reality, they work very differently.
Traditional brightness adjustment increases the overall light across the entire image. While this can make a dark photo easier to see, it often affects every area equally—including highlights that were already bright. The result can be faded colors, washed-out skies, and a loss of important details.
Hypic’s AI Flash takes a smarter approach. Instead of applying one adjustment to the whole image, it analyzes the scene, detects faces, shadows, highlights, and exposure, then enhances only the areas that actually need improvement. This usually creates a brighter image while preserving natural colors and depth.
So which method should you choose?
The answer depends on the type of photo you’re editing, how much creative control you want, and whether you prefer fast one-tap enhancements or manual fine-tuning.
In this guide, we’ll compare AI Flash vs Manual Brightness Adjustment in real editing scenarios, explain their strengths and limitations, and help you decide which option delivers the best results for portraits, selfies, landscapes, night photography, and everyday images.
Want to explore more editing features? Browse our Hypic editing guides for detailed tutorials, comparisons, and AI-powered editing tips.
Quick Answer
For most users, AI Flash is the better choice because it intelligently improves lighting without simply making the entire image brighter. It preserves highlights, enhances shadows, maintains natural skin tones, and requires very little manual editing.
Manual Brightness Adjustment still has an important role, especially for photographers and experienced editors who want precise control over exposure and creative effects. However, for everyday editing and social media content, AI Flash usually delivers cleaner, faster, and more natural-looking results.
In short:
- Choose AI Flash for quick, realistic photo enhancements.
- Choose Manual Brightness when you need complete creative control.
Why This Comparison Matters
It’s common to think that AI Flash is simply another brightness slider, but that’s not how it works.
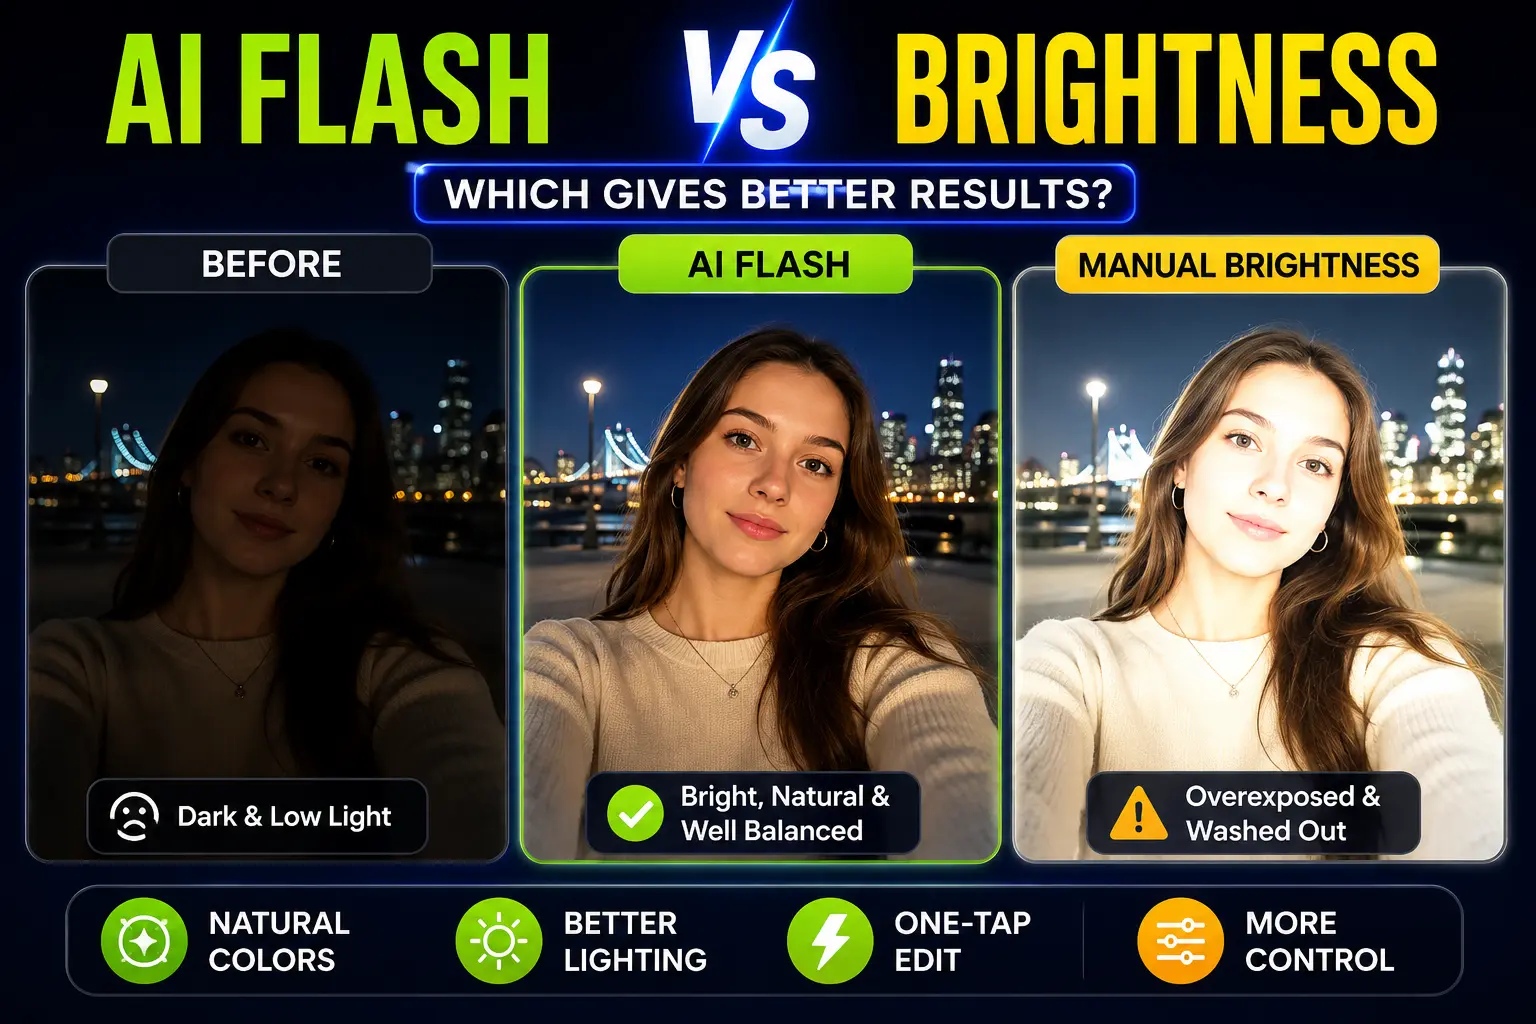
Imagine taking a selfie in a dimly lit café. If you only increase the brightness, the entire photo becomes lighter. Your face may look slightly brighter, but the lights in the background can become overexposed, colors may appear washed out, and the image can lose depth.
Now compare that with AI Flash.
Instead of treating every pixel the same, it recognizes the subject, brightens facial features, lifts dark shadows, protects brighter areas, and balances the overall lighting. The final image usually looks more like it was captured under better lighting rather than heavily edited afterward.
Understanding this difference helps you choose the right tool instead of relying on trial and error.
What Is AI Flash?
AI Flash is an intelligent photo enhancement feature in Hypic that improves lighting using artificial intelligence rather than simple brightness adjustments.
Instead of increasing luminance across the entire image, it studies multiple parts of the photo independently. The AI evaluates exposure, shadows, highlights, facial details, color balance, and contrast before deciding where additional light is actually needed.
This selective editing process helps recover hidden details while keeping naturally bright areas under control.
In practical terms, AI Flash can:
- Brighten dark faces without overexposing the background.
- Recover details hidden in shadows.
- Maintain realistic skin tones.
- Improve contrast for a cleaner look.
- Reduce the flat appearance often caused by basic brightness adjustments.
- Produce balanced results with a single tap.
Because most of the work is automated, AI Flash is especially useful for beginners who want professional-looking edits without spending time adjusting multiple sliders.
You can discover more AI-powered editing tools in our Hypic apps collection, where we cover the latest features and editing capabilities.
What Is Manual Brightness Adjustment?
Manual Brightness Adjustment is one of the oldest and most common editing tools found in photo editing apps.
Unlike AI Flash, it doesn’t analyze the image or understand which areas need correction. It simply increases or decreases the overall brightness of the entire photo.
This makes it fast and predictable, but it also means every part of the image receives the same adjustment.
For example, if you brighten a night portrait manually:
- The subject becomes brighter.
- Street lights also become brighter.
- Bright reflections may lose detail.
- Colors can appear less vibrant.
- Contrast may decrease.
To achieve a balanced result, photographers often need to adjust several additional settings, including Exposure, Highlights, Shadows, Contrast, and Saturation.
While this approach requires more time and editing experience, it offers complete creative control over the final image.
How AI Flash and Manual Brightness Actually Work
Although both tools make photos appear brighter, they use completely different editing methods.
| Feature | AI Flash | Manual Brightness |
|---|---|---|
| Editing Method | AI-powered scene analysis | Global brightness adjustment |
| Detects Faces | ✅ Yes | ❌ No |
| Shadow Recovery | ✅ Intelligent | ⚠ Limited |
| Highlight Protection | ✅ Yes | ❌ No |
| Color Balance | Automatically improved | Manual adjustment required |
| One-Tap Editing | ✅ Yes | ❌ No |
| Creative Control | Moderate | Excellent |
| Learning Curve | Beginner-friendly | Better for experienced users |
The biggest difference is that AI Flash makes decisions based on the content of your photo, while Manual Brightness simply changes one value for the entire image.
That’s why two photos edited with the same brightness level can produce completely different results depending on which method you choose.
Real-World Example
Let’s say you take a night portrait in front of a city skyline.
Using Manual Brightness
After increasing brightness:
- Your face becomes slightly clearer.
- Street lights become overly bright.
- The sky loses contrast.
- The overall image looks flatter.
- You may need to adjust Highlights, Shadows, Contrast, and Saturation to restore balance.
Using AI Flash
With AI Flash:
- Your face becomes naturally brighter.
- Building lights remain controlled.
- Shadow details become more visible.
- Colors stay realistic.
- The image looks cleaner with minimal manual adjustments.
This simple example shows why AI Flash often delivers better results for everyday photography, especially when lighting conditions are challenging.
AI Flash vs Manual Brightness: Side-by-Side Feature Comparison
| Feature | AI Flash | Manual Brightness |
|---|---|---|
| Smart Lighting Analysis | ✅ Yes | ❌ No |
| Automatic Face Enhancement | ✅ Yes | ❌ No |
| Balanced Exposure | ✅ Better | ⚠ Depends on manual editing |
| Highlight Protection | ✅ Yes | ❌ Limited |
| Shadow Recovery | ✅ Intelligent | ⚠ Basic |
| Natural Skin Tones | ✅ Excellent | Depends on skill |
| Editing Speed | ⭐⭐⭐⭐⭐ | ⭐⭐⭐ |
| Beginner Friendly | ⭐⭐⭐⭐⭐ | ⭐⭐⭐ |
| Professional Control | ⭐⭐⭐ | ⭐⭐⭐⭐⭐ |
| Best Overall for Everyday Photos | 🏆 Winner | Good Alternative |
By this point, it’s clear that both tools have their strengths. AI Flash excels in speed and intelligent enhancements, while Manual Brightness gives experienced editors greater creative flexibility.
The best choice ultimately depends on the photo you’re editing and the level of control you want over the final result.
Which Editing Method Works Best for Different Types of Photos?
There’s no single editing tool that’s perfect for every image. The right choice depends on the lighting conditions, your subject, and the style you’re trying to achieve.
Below are the most common photography scenarios and which editing method performs better in each one.
Portrait Photography
Winner: AI Flash ⭐⭐⭐⭐⭐
Portraits often need balanced lighting, especially when the subject’s face appears darker than the background.
AI Flash automatically detects facial features and selectively brightens the areas that need attention while preserving natural skin tones. This helps create a more polished portrait without requiring multiple manual adjustments.
Manual Brightness can improve a portrait too, but increasing the brightness affects the entire image equally. Bright backgrounds may become overexposed before the face reaches the desired brightness.
Best Choice
Choose AI Flash if you want:
- Brighter facial features
- Natural skin tones
- Balanced lighting
- Quick one-tap editing
Selfies
Winner: AI Flash ⭐⭐⭐⭐⭐
Selfies taken indoors, at restaurants, during parties, or at night often suffer from uneven lighting.
AI Flash intelligently lifts shadows around the face while keeping background lights under control. It also preserves color balance better than a simple brightness adjustment.
For social media creators, this usually means less editing time and more consistent results.
Manual Brightness works, but you’ll often need additional edits to reduce highlights and restore contrast afterward.
Night Photography
Winner: AI Flash ⭐⭐⭐⭐⭐
Night photography is where the difference between these two tools becomes most noticeable.
Imagine taking a photo on a city street with bright signs and dark sidewalks.
If you increase Manual Brightness:
- Street lights become brighter.
- Signs may lose detail.
- The sky becomes flatter.
- The entire image looks evenly bright.
With AI Flash:
- Faces become clearer.
- Shadow details improve.
- Bright lights remain more controlled.
- The atmosphere of the scene stays intact.
For most low-light situations, AI Flash delivers a more natural result with far less effort.
If you prefer editing on a larger screen, our Hypic for PC guide explains how to edit photos comfortably on your computer.
Indoor Photos
Winner: AI Flash ⭐⭐⭐⭐☆
Indoor environments often contain mixed lighting from windows, lamps, or ceiling lights.
AI Flash adapts to these lighting differences automatically, helping the image look more balanced without making one area too bright.
This makes it especially useful for:
- Family gatherings
- Birthday parties
- Restaurants
- Cafés
- Events
If you’re editing dozens of indoor photos, AI Flash can save a significant amount of time.
Landscape Photography
Winner: Manual Brightness ⭐⭐⭐⭐☆
Landscapes are different because photographers often want complete control over exposure and mood.
For example, during sunrise or sunset, manually adjusting Brightness, Highlights, and Contrast can produce a more artistic image.
AI Flash can still improve landscape photos, but it may brighten areas that the photographer intentionally wanted to keep darker.
If creative control is your priority, Manual Brightness remains the better option.
Food Photography
Winner: AI Flash ⭐⭐⭐⭐☆
Food photos taken in restaurants often appear darker than expected.
AI Flash can brighten the dish while maintaining realistic colors and improving overall lighting.
This helps food look fresher and more appealing without requiring advanced editing skills.
For quick Instagram uploads, AI Flash is usually the fastest solution.
Travel Photography
Winner: AI Flash ⭐⭐⭐⭐⭐
Travel photos often include people, buildings, landscapes, and different lighting conditions in a single frame.
Instead of manually adjusting multiple sliders for every image, AI Flash analyzes each photo individually and produces consistent results across an entire gallery.
This makes it ideal for travelers who want high-quality edits without spending hours on post-processing.
Professional Photo Editing
Winner: Manual Brightness ⭐⭐⭐⭐⭐
Professional photographers typically edit RAW images using multiple tools rather than relying on a single AI feature.
Manual Brightness becomes much more powerful when combined with:
- Exposure
- Highlights
- Shadows
- Whites
- Blacks
- Contrast
- Tone Curves
These adjustments allow complete creative control over the final image.
If you’re creating commercial work or artistic edits, Manual Brightness is still an important part of the editing workflow.
iPhone users can also explore our Hypic for iOS guide for device-specific editing tips and setup instructions.
Before vs. After: What Difference Can You Expect?
Many users expect AI Flash to completely transform a photo, but the goal is actually much more practical.
A good edit should make the image look as though it was captured under better lighting—not as though it has been heavily filtered.
Here’s what you can generally expect.
| Editing Result | AI Flash | Manual Brightness |
|---|---|---|
| Brighter Faces | ✅ Excellent | ⚠ Average |
| Shadow Detail | ✅ Better | Limited |
| Highlight Protection | ✅ Better | Often Lost |
| Natural Colors | ✅ Better | Depends on Editing |
| Editing Time | Around 1 Tap | Several Adjustments |
| Overall Realism | Excellent | Depends on Skill |
Can You Use AI Flash and Manual Brightness Together?
Yes—and in many situations, this produces the best results.
Instead of thinking of AI Flash and Manual Brightness as competing tools, consider them part of the same editing workflow.
A practical approach is:
- Apply AI Flash first to improve overall lighting.
- Check the image before making additional edits.
- Increase Brightness slightly only if needed.
- Fine-tune Contrast and Highlights.
- Adjust Shadows to reveal extra detail.
- Export the image at the highest quality.
This method gives you the speed of AI-powered enhancement while still allowing room for personal creative adjustments.
Recommended Editing Workflow
If you’re unsure where to start, follow this simple workflow.
Step 1
Apply AI Flash.
Step 2
Compare the edited image with the original.
Step 3
Adjust Brightness slightly if some areas still appear too dark.
Step 4
Reduce Highlights if bright lights become distracting.
Step 5
Increase Contrast slightly to restore depth.
Step 6
Fine-tune Shadows only when necessary.
Following this sequence usually produces cleaner and more natural-looking results than adjusting Brightness first.
Common Mistakes to Avoid
Even experienced editors sometimes rely too heavily on a single adjustment.
Here are the most common mistakes.
Increasing Brightness Too Much
This often causes washed-out colors and overexposed highlights.
Ignoring Highlights
Bright signs, windows, and street lights can quickly lose detail if Highlights aren’t reduced after increasing Brightness.
Editing Every Photo the Same Way
A portrait, landscape, and food photo all require different adjustments.
Choose the editing method based on the scene rather than using identical settings every time.
Expecting AI Flash to Fix Everything
AI Flash can dramatically improve lighting, but it can’t repair blurry images or restore details that were never captured by the camera.
Starting with a well-focused photo will always produce the best editing results.
AI Flash Pros and Cons
Like any editing tool, AI Flash has strengths and limitations. Understanding both helps you decide when it’s the right choice.
Pros
- One-tap lighting enhancement
- Intelligently detects faces, shadows, and highlights
- Produces natural-looking results
- Saves time compared to manual editing
- Great for beginners and casual users
- Excellent for portraits, selfies, and night photography
- Maintains balanced colors and contrast
Cons
- Offers less creative control than manual editing
- Results may vary depending on the original photo
- Cannot fix blurry or out-of-focus images
- Some photos may still benefit from additional manual adjustments
Manual Brightness Pros and Cons
Manual Brightness remains an essential editing tool, especially for users who enjoy complete control over every adjustment.
Pros
- Full creative flexibility
- Works in almost every photo editing app
- Ideal for professional editing workflows
- Can be combined with exposure, highlights, shadows, and contrast adjustments
- Excellent for artistic editing styles
Cons
- Requires editing knowledge
- More time-consuming
- Easy to overexpose bright areas
- Often needs several additional adjustments to achieve balanced results
Which One Should You Choose?
The best choice depends on your editing goals.
| If You Want To… | Best Option |
|---|---|
| Edit photos quickly | ✅ AI Flash |
| Improve night photos | ✅ AI Flash |
| Enhance portraits | ✅ AI Flash |
| Edit selfies | ✅ AI Flash |
| Save time | ✅ AI Flash |
| Control every adjustment | ✅ Manual Brightness |
| Create artistic edits | ✅ Manual Brightness |
| Edit RAW images | ✅ Manual Brightness |
| Improve social media photos | ✅ AI Flash |
For most everyday users, AI Flash is the better option because it combines speed, simplicity, and natural-looking results.
Manual Brightness remains valuable for photographers and advanced editors who prefer to build every adjustment manually.
Pro Tips for Better Photo Editing
No matter which method you choose, these simple tips can improve your editing results.
Start With the Original Photo
Always edit the highest-quality version of your image. Re-editing compressed photos can reduce detail and increase visible artifacts.
Avoid Maximum Brightness
Increasing brightness too much often removes depth and makes colors appear washed out.
Small adjustments usually produce more realistic results.
Compare Before and After
Switch between the original and edited versions before saving your image.
If the edit immediately looks “obvious,” you’ve probably gone too far.
The best edits often look natural rather than dramatic.
Keep the Mood of the Scene
A night photo should still feel like a night photo.
The goal is to reveal important details—not to make every image look like it was taken in daylight.
Our Experience Testing Both Methods
To compare these editing methods fairly, we tested AI Flash and Manual Brightness on a variety of common photography scenarios, including indoor portraits, restaurant selfies, travel photos, city night scenes, and outdoor landscapes.
In most low-light situations, AI Flash consistently produced brighter, more balanced images with minimal effort. Faces looked clearer, shadows retained more detail, and highlights stayed under better control.
Manual Brightness performed well when we wanted a specific creative style or needed precise adjustments, but it usually required extra edits to reach the same balanced appearance.
Based on these tests, AI Flash is the better choice for everyday editing, while Manual Brightness remains the preferred option for users who want complete creative control.
Frequently Asked Questions
Is AI Flash better than Brightness Adjustment?
For most everyday photos, yes. AI Flash selectively enhances lighting while preserving shadows, highlights, and natural colors, whereas Brightness Adjustment affects the entire image equally.
Can AI Flash completely replace Manual Brightness?
Not entirely.
AI Flash is excellent for quick, intelligent enhancements, but Manual Brightness is still useful for photographers and advanced editors who need precise creative control.
Can I use AI Flash and Manual Brightness together?
Yes. A common workflow is to apply AI Flash first, then make small manual brightness adjustments if the image still needs additional light.
Which tool is better for night photography?
AI Flash is usually the better choice because it improves dark areas while protecting brighter parts of the image.
Does AI Flash work for indoor photos?
Yes. It’s especially effective for restaurants, cafés, parties, events, and other indoor environments with uneven lighting.
Is Manual Brightness better for professionals?
Many professionals prefer Manual Brightness because it can be combined with advanced adjustments such as exposure, highlights, shadows, tone curves, and color grading.
Can AI Flash improve old photos?
AI Flash can enhance lighting and make older photos appear brighter, but it cannot fully restore damage, heavy blur, or missing image details.
Does AI Flash reduce image quality?
No. When used on a high-quality original image and exported at full resolution, AI Flash maintains image quality while improving overall lighting.
Final Verdict
AI Flash and Manual Brightness are both valuable editing tools, but they serve different purposes.
If your goal is to brighten photos quickly while maintaining natural colors, balanced exposure, and realistic lighting, AI Flash is the clear winner. Its intelligent scene analysis makes it ideal for portraits, selfies, indoor photography, travel images, and low-light situations where manual adjustments can be time-consuming.
On the other hand, Manual Brightness remains the better choice for photographers and experienced editors who want complete creative freedom. When combined with exposure, highlights, shadows, and contrast adjustments, it provides precise control over every aspect of an image.
Rather than thinking of these tools as competitors, consider them complementary. Many editors achieve the best results by starting with AI Flash to improve overall lighting and then making small manual refinements where needed.
Ultimately, the right choice depends on your editing style, but for most users looking for fast, high-quality results, AI Flash offers the smarter and more efficient workflow.