How to Use Polaroid Reference Editing in Hypic (2026 Guide)
Want to give your photos a nostalgic Polaroid-inspired look without adjusting every setting manually? Hypic’s reference-based editing tools can make that process much easier.
Instead of building an instant-camera style from scratch, you can use a suitable reference image to guide the visual direction of your edit. Depending on the reference and the original photo, this can influence the colors, lighting, mood, texture, and overall character of the image.
This can be especially useful for portraits, travel photos, selfies, lifestyle pictures, and social media content created with the Hypic photo editor.
In this guide, we’ll explain how to use Polaroid Reference Editing in Hypic, how to choose a suitable reference image, which photos work best, common problems to avoid, and practical tips for getting a more natural instant-camera look.
Note: Hypic’s interface and feature availability can change between app versions or regions. The exact name or location of a reference-editing feature may therefore look different on your device.
Quick Answer
To use Polaroid Reference Editing in Hypic, start by opening your photo in Hypic and looking for the available reference-based editing or AI editing option. Select a suitable Polaroid-style reference image, apply the edit, review the result, and make small adjustments if necessary before exporting.
For the best results:
- Choose a reference with a similar subject.
- Match the lighting as closely as possible.
- Look for natural skin tones if you’re editing a portrait.
- Avoid references that are heavily stylized unless you want a dramatic transformation.
- Compare the result with your original photo.
- Make small adjustments rather than stacking too many effects.
The most important part of the process is choosing the right reference.
What Is Polaroid Reference Editing in Hypic?
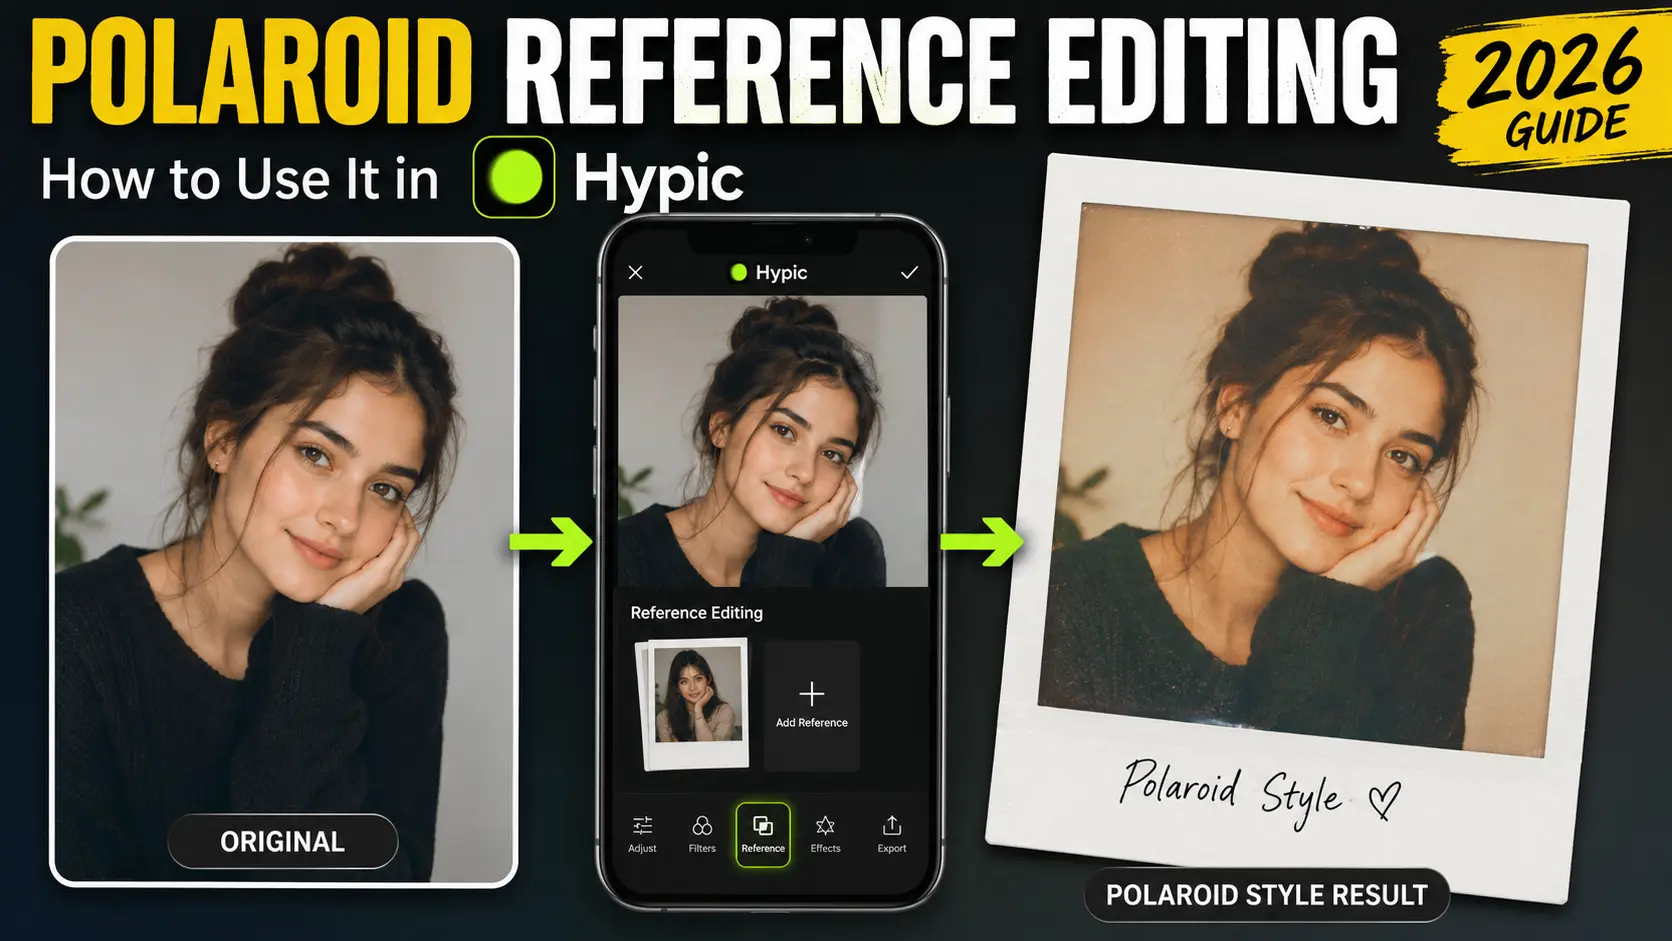
Polaroid Reference Editing is a reference-based approach that can help guide a photo toward a Polaroid-inspired visual style.
Rather than manually adjusting every part of an image, you can use another photo as a visual reference. The reference provides an example of the kind of appearance you want to create.
A Polaroid-inspired image may include characteristics such as:
- Soft or slightly faded colors
- Warm or muted tones
- Casual composition
- Direct flash
- Gentle contrast
- Slightly imperfect exposure
- Film-like texture
- Nostalgic atmosphere
- Instant-camera framing
The exact result depends on the original image, the reference image, and the editing capabilities available in your version of Hypic.
The basic idea is simple:
Your original photo provides the subject, while the reference image provides visual direction.
This makes reference editing different from simply applying a traditional filter.
Why Use a Polaroid Reference in Hypic?
Creating a convincing instant-camera aesthetic manually can take time.
You might normally have to adjust:
- Brightness
- Contrast
- Saturation
- Highlights
- Shadows
- Color temperature
- Grain
- Sharpness
- Texture
A reference-based workflow can reduce some of that trial and error by giving the edit a specific visual direction.
It can be useful when you want:
- A nostalgic photo style
- A Polaroid-inspired color palette
- Faster editing
- Consistent-looking images
- Creative inspiration
- Casual social media photos
- Retro-style portraits and selfies
It is especially useful when you have a particular Polaroid image in mind and want to use its overall character as inspiration rather than trying to recreate the look from individual settings.
If you’re looking for more creative ideas, you can also explore our Hypic Prompts for additional editing inspiration.
How to Use Polaroid Reference Editing in Hypic
The exact steps can vary depending on the Hypic version you’re using, but the general process follows a simple workflow.
Step 1: Open Hypic
Start by opening Hypic for iOS on your phone.
Make sure your app is updated if you’re looking for a newer AI or reference-editing feature. If the option isn’t visible, its availability may depend on your current version or region.
Step 2: Choose Your Original Photo
Select the photo you want to transform.
For your first attempt, choose an image with a clear subject and relatively simple composition.
Good starting points include:
- Portraits
- Selfies
- Travel photos
- Couple photos
- Party pictures
- Street photography
- Lifestyle images
A simple photo makes it easier to see how the reference changes the overall appearance.
Step 3: Find the Reference Editing Tool
Explore the available AI, editing, or reference-based features in Hypic.
Depending on your version, the feature may have a slightly different name or appear in a different part of the editing interface.
If you find a reference-editing option, open it and follow the on-screen instructions for adding a reference image.
Step 4: Choose a Polaroid Reference Image
This is one of the most important steps.
Don’t choose a reference simply because it has a Polaroid frame.
Instead, think about the visual characteristics you want to recreate.
Look at:
- Lighting
- Subject
- Composition
- Colors
- Contrast
- Skin tones
- Flash
- Texture
- Overall mood
For example, if you’re editing a night selfie, a bright outdoor Polaroid reference may not be the best choice.
A flash-based Polaroid portrait would probably provide a more relevant visual direction.
Step 5: Apply the Reference
Add your chosen reference and apply the edit.
The resulting image can vary depending on both the reference and the original photo.
You may notice changes in:
- Color
- Brightness
- Contrast
- Mood
- Lighting character
- Texture
- Overall retro appearance
Don’t expect the final image to become an exact copy of the reference.
The reference is better understood as visual guidance, rather than a template that guarantees an identical result.
Step 6: Compare the Result With the Original
Before making more changes, compare the edited image with the original.
Ask yourself:
- Does the photo actually feel more Polaroid-like?
- Are the colors still natural?
- Does the lighting make sense?
- Are skin tones believable?
- Has the image become too saturated?
- Does the reference fit the subject?
- Is the effect too strong?
This step is important because a stronger effect isn’t necessarily a better effect.
Step 7: Fine-Tune the Image
If the result is close but needs a little adjustment, make small changes.
Depending on the tools available in your workflow, you might adjust:
- Brightness
- Contrast
- Saturation
- Warmth
- Highlights
- Shadows
- Sharpness
- Texture
Try to preserve the character of the reference without making the image look overly processed.
Step 8: Save or Export the Final Photo
Once you’re happy with the result, save or export your image.
Before doing so, view the photo at full size.
Check the:
- Face
- Skin tones
- Edges
- Highlights
- Shadows
- Background
- Overall color balance
If you’re creating content for social media, also check whether the crop works for the platform where you plan to post it.
How to Choose the Best Polaroid Reference
The quality of your reference can have a major impact on the editing direction.
A good reference doesn’t necessarily have to be technically perfect. It simply needs to communicate the visual style you want.
Match the Subject
Try to use a reference with a similar subject.
For example:
Portrait → Polaroid portrait
Travel photo → Outdoor Polaroid
Night selfie → Flash Polaroid selfie
Party photo → Flash-heavy party snapshot
This gives the reference a more relevant visual context.
Match the Lighting
Lighting is another important factor.
A daylight photo and a dark flash photograph can have completely different visual characteristics.
Whenever possible, choose a reference with lighting that is reasonably similar to your original photo.
Match the Composition
Composition doesn’t have to be identical, but similar framing can help.
For example, a close-up selfie may work better with a close-up Polaroid portrait than with a distant landscape.
Look at the Colors
Don’t focus only on whether the image looks “vintage.”
Look at the actual color palette.
Does it have:
- Warm tones?
- Muted colors?
- Slightly faded blacks?
- Soft highlights?
- Neutral skin tones?
These details can help you choose a more suitable reference.
Best Polaroid References for Different Photos
Here’s a simple starting point:
| Photo Type | Recommended Reference | Why It Works |
|---|---|---|
| Selfie | Flash Polaroid portrait | Matches casual facial lighting |
| Outdoor portrait | Soft daylight Polaroid | Keeps the lighting believable |
| Night photo | Direct-flash Polaroid | Fits the darker environment |
| Travel photo | Faded outdoor Polaroid | Creates a nostalgic memory feel |
| Party photo | Flash-heavy instant photo | Matches spontaneous snapshots |
| Couple photo | Warm Polaroid portrait | Adds a softer nostalgic mood |
| Street photo | Muted-color Polaroid | Works with casual urban scenes |
| Indoor photo | Indoor instant-camera image | Provides more relevant lighting |
Use this table as a starting point rather than a strict rule. The best reference still depends on the original image.
Best Photos for Polaroid Reference Editing in Hypic
Some photos naturally fit the instant-camera aesthetic better than others.
Portraits
Portraits are one of the easiest places to start.
A casual pose, natural expression, and moderate lighting can work particularly well.
Try to avoid excessive skin smoothing if you want the image to retain a spontaneous instant-camera character.
Selfies
Selfies can work extremely well with Polaroid-inspired editing.
A casual flash selfie, especially with a darker background, can immediately create a nostalgic compact-camera feeling.
Travel Photos
Travel images can benefit from the imperfect and personal character associated with instant photography.
Outdoor references with similar lighting are usually a good starting point.
Party Photos
Party photography and instant-camera aesthetics are a natural combination.
Flash, casual framing, imperfect exposure, and spontaneous expressions can all contribute to the style.
Street Photography
Street scenes can also work well, especially when the reference uses muted colors and moderate contrast.
Tips From Working With Polaroid-Style References
When choosing a reference, think about the relationship between the two images, not just whether the reference looks attractive.
A highly stylized fashion image may look impressive on its own but may not be suitable for a simple family snapshot.
Similarly, a colorful outdoor Polaroid may not be the best choice for a dark indoor portrait.
A useful rule is:
Choose a reference that resembles the kind of photo you want to create, not simply the kind of photo you like looking at.
This can make the final result easier to control.
How to Make a Polaroid Edit Look More Natural
The goal isn’t to make every retro characteristic extremely obvious.
A convincing nostalgic edit usually feels integrated into the original photo.
Don’t Overdo Saturation
Extremely strong colors can make the result look more like a modern filter than an instant-camera photograph.
Keep Skin Tones Believable
When editing portraits, natural skin tones should usually take priority over perfectly matching the reference.
If the reference has strong color grading, the subject’s skin may become too orange, pink, or yellow.
Avoid Excessive Sharpness
Modern smartphone photos can be extremely crisp.
A slightly softer appearance can sometimes work better for a nostalgic instant-camera style.
Don’t Add Every Retro Effect
You don’t necessarily need grain, heavy fading, extreme color shifts, borders, and flash effects all at once.
A restrained edit can feel more believable.
Start With Casual Photos
Polaroid aesthetics often work naturally with spontaneous photos.
A perfectly polished studio image may require more careful editing to make the retro treatment feel convincing.
Polaroid Reference Editing vs Traditional Filters
Reference editing and traditional filters are useful for different reasons.
Traditional Filters
A filter generally applies a predefined visual treatment.
You choose a style and, when available, adjust its intensity.
Filters are useful when you want:
- Speed
- Consistency
- Simplicity
- Predictable results
Reference Editing
Reference editing uses another image as visual direction.
It can be more useful when you want:
- A specific visual mood
- A particular color character
- Creative experimentation
- Inspiration from an existing image
The simplest difference is:
Filter = choose a predefined look
Reference editing = use another image to guide the look
If you want to explore more ways to edit and transform your photos, check out our Hypic photo editing tools for additional options.
Polaroid Reference Editing vs Manual Editing
There is also a difference between reference-based editing and creating the look manually.
Reference Editing
Best for: speed and experimentation
You provide an example and let the editing workflow guide the transformation.
Manual Editing
Best for: detailed control
You individually adjust color, exposure, contrast, grain, highlights, shadows, and other characteristics.
Manual editing can give you more precise control, but it also takes more time.
For most casual users, reference editing can be a convenient starting point.
Polaroid Reference Editing Tips for Better Results
1. Use a Clear Reference
Choose a reference where the colors and lighting are easy to understand.
2. Match the Subject
A portrait reference usually makes more sense for a portrait than a landscape reference.
3. Match the Lighting
Try to keep daylight, indoor, and flash references within similar visual conditions.
4. Avoid Extremely Stylized References
Unless you’re intentionally looking for a dramatic transformation, heavily edited references can produce unpredictable results.
5. Try Multiple References
Your first reference isn’t necessarily your best reference.
Experiment with several options and compare the results.
6. Keep the Original Photo in Mind
A reference can’t completely change the physical lighting or composition of the original image.
Start with a photo that already has some characteristics that suit the style.
7. Make Small Adjustments Afterwards
Treat reference editing as a creative starting point.
A few subtle adjustments can often improve the final image.
Common Problems With Polaroid Reference Editing
The Result Doesn’t Look Like a Polaroid
The reference may not clearly communicate an instant-camera aesthetic.
Try a reference with:
- Soft or muted colors
- Casual composition
- Flash
- Natural skin tones
- Slightly imperfect exposure
- Instant-camera characteristics
The Colors Are Too Strong
If the image looks excessively saturated, reduce the intensity where possible or make subtle color adjustments afterward.
The Photo Still Looks Too Modern
Very sharp smartphone photos can retain a modern appearance even after applying a retro style.
Try a softer, more naturally lit reference instead of adding stronger filters.
Skin Tones Look Strange
A heavily color-graded reference can affect the appearance of skin.
Choose a reference with realistic-looking people and make small corrections afterward if necessary.
The Reference Changes Too Much
The reference may simply be too different from your original photo.
Try matching the:
- Subject
- Lighting
- Composition
- Environment
rather than focusing only on the reference’s color palette.
Can You Use Any Polaroid Photo as a Reference?
Not necessarily.
A Polaroid photo can contain many different visual characteristics.
For example, one may be:
- Warm and faded
- Cool and contrasty
- Flash-heavy
- Soft and pastel
- Dark and moody
- Highly saturated
So choosing a reference simply because it is technically a Polaroid photo isn’t enough.
Look at the complete image.
Ask:
Does this reference have the lighting, colors, composition, and mood I want?
If the answer is yes, it is probably worth trying.
Can Polaroid Reference Editing Work for Social Media?
Yes.
Polaroid-inspired images can work particularly well for social media because they create a casual and nostalgic visual identity.
You can use the style for:
- Instagram posts
- Photo dumps
- Travel carousels
- Birthday photos
- Couple photos
- Lifestyle content
- Pinterest-style images
- Personal photo collections
If you’re editing multiple images for the same post, try to use references with similar visual characteristics.
This can help the photos feel like part of the same collection.
Polaroid Reference Editing Ideas
If you’re looking for creative ways to experiment, try these combinations.
Polaroid Portrait
Use a casual portrait reference with soft colors and natural skin tones.
Flash Selfie
Choose a reference with direct flash and a darker background.
Travel Memory
Try a slightly faded outdoor reference for vacation photos.
Party Snapshot
Use a flash-heavy reference with casual framing.
Couple Photo
Choose a warm and nostalgic portrait reference.
Vintage Street Photo
Look for muted colors, moderate contrast, and slightly imperfect exposure.
How to Get the Classic Polaroid Feel
If you want the image to immediately feel like an instant-camera photograph, focus on the overall character rather than adding every possible retro effect.
A convincing result can combine:
- Casual composition
- Direct or soft flash
- Slightly muted colors
- Natural skin tones
- Moderate contrast
- Subtle texture
- Imperfect exposure
- Nostalgic framing
The key is restraint.
A photo doesn’t need to look extremely old to feel nostalgic.
Polaroid Reference Editing vs Other Retro Styles
Polaroid is only one type of nostalgic photography.
Different retro aesthetics can produce very different results.
| Style | Overall Character | Best For |
|---|---|---|
| Polaroid | Instant-camera nostalgia | Portraits and memories |
| Disposable camera | Flashy and imperfect | Parties and casual photos |
| Film | Analog and cinematic | Travel and portraits |
| Digital camera | Crisp retro digital look | Night photos and selfies |
| VHS | Low-resolution nostalgic look | Creative social content |
Choosing the right style depends on the original photo and the mood you’re trying to create.
When Should You Avoid a Polaroid Reference?
A Polaroid-inspired style isn’t necessarily suitable for every photo.
You may want to avoid it when:
- The original photo already has very strong color grading.
- The subject requires highly accurate colors.
- The lighting is dramatically different from your reference.
- You need a clean professional product image.
- The retro look conflicts with the purpose of the photograph.
For professional or commercial photography, accuracy may be more important than nostalgia.
How to Keep a Consistent Polaroid Style Across Multiple Photos
If you’re editing a collection rather than one image, consistency becomes important.
Try to keep the references similar in:
- Color temperature
- Contrast
- Saturation
- Lighting
- Overall mood
For example, if one image has a warm faded appearance and the next has a strong cool flash effect, the two photos may feel like they belong to completely different collections.
A consistent reference style can make a photo dump, carousel, or personal album feel more cohesive.
Frequently Asked Questions
What is Polaroid Reference Editing in Hypic?
Polaroid Reference Editing in Hypic is a reference-based editing approach that can guide a photo toward a Polaroid-inspired visual style using another image as visual direction.
How do I use Polaroid Reference Editing in Hypic?
Open Hypic, select the photo you want to edit, find the available reference-based editing feature, choose a suitable Polaroid-style reference, apply the edit, review the result, and make small adjustments before exporting.
The exact interface can vary between Hypic versions.
What is the best reference image for Hypic Polaroid editing?
The best reference depends on your original photo. For a portrait, use a Polaroid portrait with similar lighting. For a travel photo, an outdoor Polaroid reference may be more appropriate.
Can I use a selfie for Polaroid Reference Editing?
Yes. Selfies can work very well, particularly when the reference has natural skin tones and a casual instant-camera appearance.
Does Polaroid Reference Editing make photos look like real Polaroids?
It can create a Polaroid-inspired appearance, but it does not guarantee that every image will look exactly like a physical Polaroid photograph. The final result depends on the original photo, reference, and available editing tools.
Why does my Hypic Polaroid edit look too modern?
The original photo may be extremely sharp or heavily processed, or your reference may not contain enough instant-camera characteristics. Try a more casual reference with softer colors, natural lighting, or direct flash.
Can I edit the photo after using the reference?
Yes, when additional editing tools are available in your Hypic workflow, you can make subtle adjustments after applying the reference-based style.
Is Polaroid Reference Editing better than a normal filter?
It depends on your goal. A normal filter is generally faster and more predictable, while reference editing can provide more creative direction based on a specific image.
Can I use Polaroid edits for Instagram?
Yes. Polaroid-inspired photos can work well for Instagram posts, carousels, photo dumps, travel content, selfies, and lifestyle photography.
Why does my reference produce an unnatural result?
The reference may be too different from your original photo in terms of lighting, subject, composition, or color. Try using a reference that shares more characteristics with the original image.
Final Verdict
Polaroid Reference Editing in Hypic can be a useful way to create an instant-camera-inspired look without manually building every adjustment from scratch.
The biggest factor in the final result isn’t simply the editing feature itself. Your choice of reference matters.
A good reference should have a visual relationship with your original photo. Similar lighting, subject matter, composition, and color characteristics can make the editing direction more suitable.
For the best workflow:
Choose a relevant reference → Apply the edit → Compare it with the original → Fine-tune the result → Export
If you’re editing a selfie, look for a similar Polaroid portrait. For travel photography, try an outdoor reference. For night photos, a flash-based instant-camera image can be a better starting point.
And don’t feel like you need to make every retro characteristic obvious. Slightly muted colors, natural skin tones, casual composition, and subtle imperfections can often create a more convincing result than an extremely strong filter.
Whether you’re creating an Instagram photo dump, editing travel memories, or simply experimenting with nostalgic photography, Polaroid Reference Editing in Hypic gives you a simple way to explore the instant-camera aesthetic while keeping your original photo at the center of the edit.
The best Polaroid edit isn’t necessarily the one with the strongest effect. It’s the one where the reference, subject, lighting, and overall mood feel like they belong together.