Best AI Flash Settings in Hypic for Night Photos (2026 Guide)
Taking photos at night is exciting, but the results are not always what you expect. A beautiful city skyline, glowing street lights, or a dinner with friends can easily turn into a dark, noisy, and blurry image. Low-light photography is one of the biggest challenges for smartphone cameras, especially when lighting conditions are poor.
Fortunately, Hypic AI Flash makes it much easier to rescue underexposed photos without needing professional editing skills. Instead of manually adjusting dozens of sliders, the AI analyzes your image and intelligently improves brightness, shadows, colors, and facial details while keeping the photo as natural as possible.
If you’ve ever wondered which AI Flash settings produce the best results, this guide is for you.
In this article, you’ll learn:
- The best AI Flash settings for different night scenes
- How AI Flash actually improves dark photos
- When to use low, medium, or high AI Flash intensity
- Common mistakes that make night photos look fake
- Pro editing tips for natural-looking results
By the end of this guide, you’ll know exactly how to transform dark, dull night photos into bright, clean, and social-media-ready images using Hypic.
If you want more AI-powered editing tips after mastering night photos, explore our Hypic editing tutorials for additional guides and creative workflows.
What Is AI Flash in Hypic?
AI Flash is one of Hypic’s intelligent enhancement tools designed specifically for photos taken in poor lighting conditions. Unlike a traditional camera flash, it doesn’t add light while taking the picture. Instead, it uses artificial intelligence to analyze the existing image and enhance it after the photo has already been captured.
The tool automatically identifies dark areas, recognizes faces, restores hidden details, reduces visible noise, improves contrast, and balances colors without requiring advanced editing knowledge.
Rather than applying the same adjustment everywhere, AI Flash makes localized improvements. This means bright areas remain protected while darker regions receive the enhancement they actually need.
For casual users, this saves time. For content creators, it creates cleaner photos without spending several minutes editing every image manually.
AI Flash is one of several intelligent tools available inside the app, and you can discover more features in our Hypic app guides.
Why Night Photos Usually Look Bad
Understanding why night photos lose quality helps you use AI Flash more effectively.
When there’s not enough available light, your smartphone camera has to compensate in several ways. It often increases ISO sensitivity, slows down the shutter speed, or relies heavily on software processing.
These adjustments commonly create problems such as:
- Grainy image noise
- Soft or blurry details
- Dark faces
- Lost shadow detail
- Washed-out colors
- Overexposed street lights
- Uneven lighting across the photo
Even flagship smartphones struggle in extremely dark environments.
AI Flash helps recover much of this lost quality by intelligently rebuilding brightness, improving visibility, and balancing exposure.
How AI Flash Works
Many people think AI Flash simply increases brightness.
In reality, it performs several image enhancements simultaneously.
When you apply AI Flash, Hypic’s AI analyzes different parts of the image independently instead of treating the photo as one flat layer.
It typically improves:
Brightness Recovery
Dark areas become easier to see without making the entire image look overexposed.
Shadow Enhancement
Hidden details inside shadows become more visible while preserving depth.
Face Detection
If people appear in the photo, AI Flash prioritizes facial brightness and skin detail so faces don’t disappear into the darkness.
Noise Reduction
Night images usually contain digital grain. AI Flash softens unwanted noise while trying to preserve important textures.
Color Restoration
Low-light photos often lose color accuracy. AI Flash restores warmer skin tones and more balanced colors throughout the image.
Smart Contrast
Instead of making everything brighter, AI Flash improves separation between light and dark areas to create a cleaner, more professional appearance.
Best AI Flash Settings in Hypic for Night Photos
There isn’t one universal AI Flash setting that works perfectly for every image. The ideal intensity depends on how dark your photo is and what you’re trying to preserve.
Below are the recommended starting points for most situations.
| Night Photo Type | Recommended AI Flash |
|---|---|
| Indoor restaurant | 30–40% |
| Night selfies | 35–50% |
| Street photography | 40–55% |
| City lights | 25–40% |
| Sunset after dark | 20–35% |
| Group photos | 40–60% |
| Outdoor portraits | 45–60% |
| Very dark scenes | 60–70% (only if necessary) |
These ranges usually produce a natural result while avoiding the artificial “over-edited” look.
As a general rule, it’s better to start with a lower intensity and gradually increase it only if your image still appears too dark.
Why Lower AI Flash Settings Often Look Better
One of the biggest mistakes beginners make is immediately pushing AI Flash to the maximum level.
While this certainly makes the photo brighter, it can also introduce unwanted side effects, including:
- Flat lighting
- Unrealistic skin tones
- Loss of natural shadows
- Artificial textures
- Reduced depth
- Overprocessed appearance
Professional editors typically aim for subtle improvements rather than dramatic changes.
If viewers can’t tell the image has been edited—but simply think it looks like a great photo—you’ve usually found the right balance.
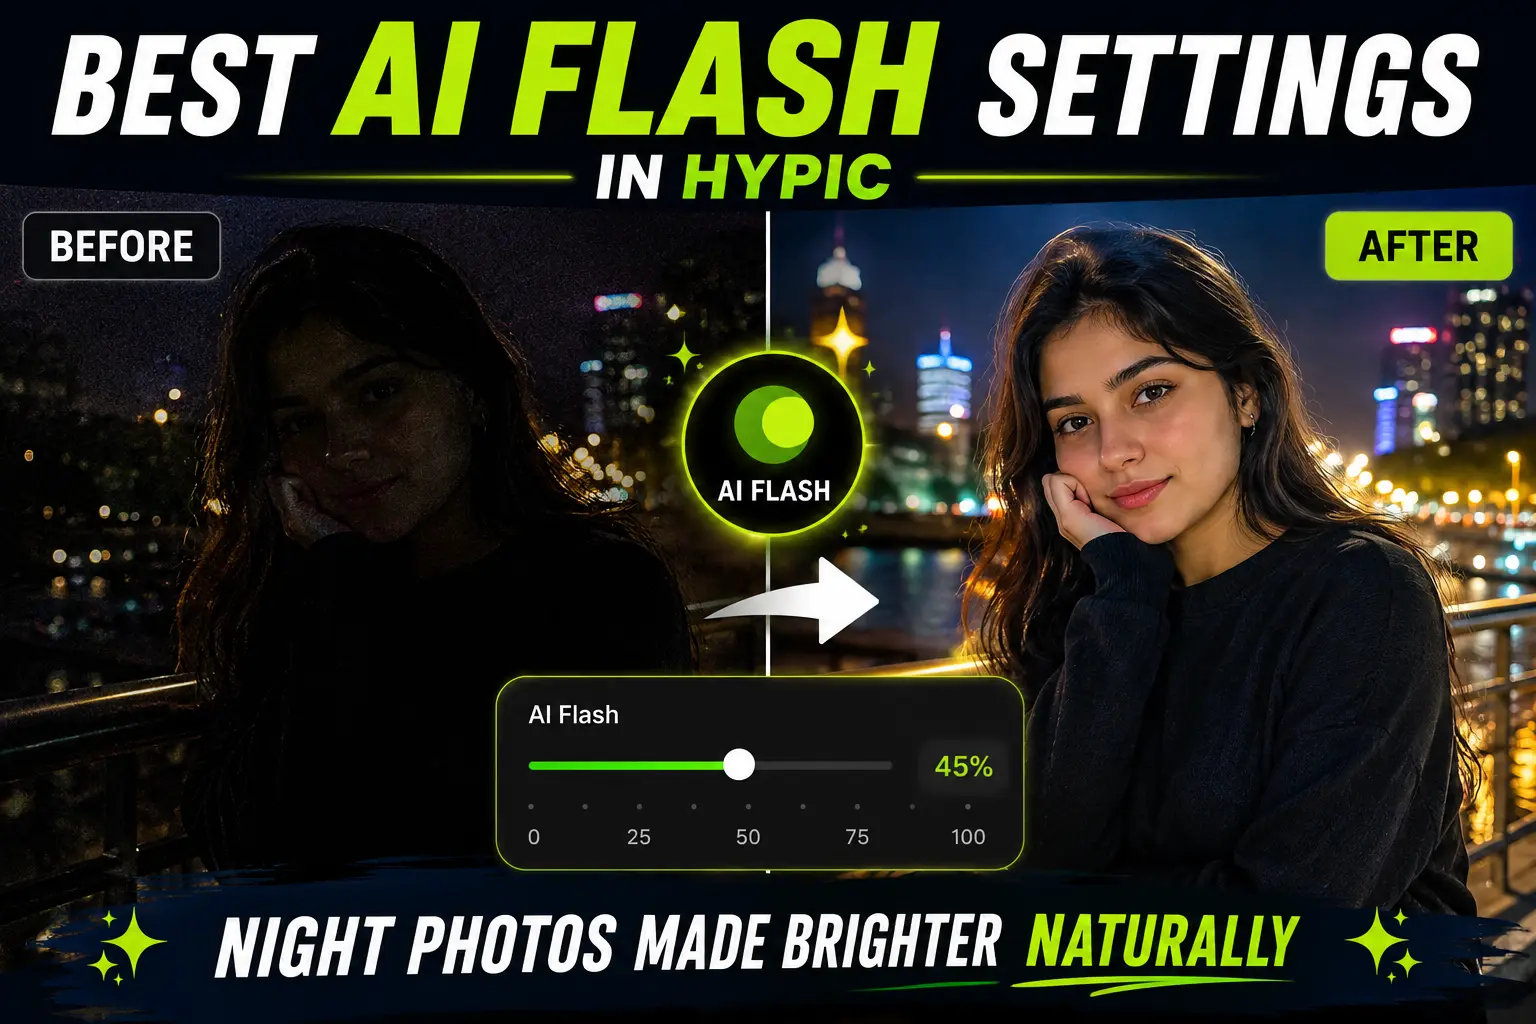
For most night photos, an AI Flash intensity between 35% and 55% delivers the most realistic results.
How to Use AI Flash in Hypic for Better Night Photos
Once you understand the recommended AI Flash intensity, the next step is applying it correctly. The editing process only takes a few minutes, but following the right order makes a noticeable difference in the final result.
Step 1: Open Your Night Photo
Launch the Hypic app and import the night photo you want to improve.
Choose the original image instead of one that’s already been edited. Starting with the highest-quality version gives the AI more information to work with, resulting in cleaner enhancements.
Step 2: Find the AI Flash Tool
Go to the AI enhancement section and select AI Flash.
Hypic will automatically analyze your photo before suggesting an enhancement. Depending on your device, this usually takes only a few seconds.
Step 3: Start with a Low AI Flash Intensity
Avoid using the highest setting immediately.
Instead, begin around 35–40% and carefully compare the before and after versions.
Ask yourself:
- Is the subject brighter?
- Are facial details clearer?
- Does the lighting still look natural?
- Are highlights still preserved?
If the image still feels too dark, increase the intensity gradually rather than making a large jump.
Step 4: Fine-Tune the Image
AI Flash works best when combined with a few small manual adjustments.
A balanced editing workflow often produces more natural results than relying on AI Flash alone.
A good starting point is:
| Setting | Recommended Adjustment |
|---|---|
| AI Flash | 35–55% |
| Exposure | +5 to +10 |
| Contrast | +5 |
| Highlights | -10 |
| Shadows | +10 |
| Saturation | +3 |
| Sharpness | +5 |
These values are not strict rules, but they provide a natural-looking baseline for most night photos.
Best AI Flash Settings for Different Night Scenes
Every night photo is different. A city skyline needs different adjustments than a selfie taken under restaurant lighting.
Here are the settings that generally produce the most consistent results.
Night Selfies
Faces often become the darkest part of a night photo.
For selfies:
- AI Flash: 40–50%
- Slight Exposure increase
- Reduce Highlights
- Add a small amount of Sharpness
This combination brightens skin while keeping facial features natural.
City Lights
Street lights, neon signs, and illuminated buildings can easily become overexposed.
Recommended settings:
- AI Flash: 25–40%
- Lower Highlights
- Slight Contrast increase
- Minimal Saturation adjustment
This helps preserve glowing lights while revealing darker details.
Outdoor Portraits
Portraits taken outdoors at night usually need stronger enhancement.
Recommended settings:
- AI Flash: 45–60%
- Shadows +10
- Contrast +5
- Sharpness +5
These adjustments improve facial visibility without making the background look artificial.
Indoor Restaurants and Cafés
Warm indoor lighting often creates yellow or orange color casts.
Recommended workflow:
- AI Flash: 30–40%
- Slight Exposure increase
- Lower Highlights
- Reduce Saturation slightly if colors appear too warm
This keeps food, skin tones, and ambient lighting looking realistic.
Concerts and Events
Concert photos often include bright stage lights surrounded by dark backgrounds.
For these images:
- AI Flash: 30–45%
- Highlights -15
- Shadows +10
- Contrast +5
This restores detail without blowing out the stage lighting.
Street Photography
Street scenes usually contain a mix of shadows, reflections, and artificial lights.
Recommended settings:
- AI Flash: 40–55%
- Exposure +5
- Highlights -10
- Contrast +5
These edits preserve the atmosphere while making important subjects easier to see.
The Best Editing Workflow for Natural Results
One of the biggest reasons night photos look over-edited is using every editing tool at maximum strength.
A better approach is to edit in a logical order.
A simple workflow is:
- Apply AI Flash.
- Adjust Exposure only if needed.
- Reduce Highlights to recover bright lights.
- Increase Shadows slightly.
- Add a small amount of Contrast.
- Improve Sharpness.
- Review the image before saving.
Following this sequence allows each adjustment to complement the previous one, resulting in a cleaner and more balanced edit.
If you are editing on a laptop or desktop, check our Hypic for PC setup guide to create the same night-photo workflow on a larger screen.
Common AI Flash Mistakes to Avoid
Even though AI Flash is easy to use, a few mistakes can make your photos look unrealistic.
Using Maximum AI Flash
Higher isn’t always better.
An intensity above 70% often creates flat lighting, unnatural skin tones, and a processed appearance.
Ignoring Highlights
Bright signs, street lamps, and car headlights can lose detail if Highlights aren’t reduced after applying AI Flash.
Over-Sharpening
Adding too much Sharpness makes digital noise more visible.
Small adjustments are usually enough.
Editing an Already Edited Photo
Each round of editing compresses image quality.
Whenever possible, edit the original photo instead of applying AI Flash to an image that has already been enhanced.
Applying the Same Settings to Every Photo
Every scene has different lighting conditions.
Use the recommended ranges in this guide as a starting point, then fine-tune each image based on its unique exposure and subject.
Before vs. After: What You Should Expect
A well-edited night photo shouldn’t look dramatically different—it should simply look like the camera captured the scene more accurately.
With the right AI Flash settings, you can expect:
- Brighter and clearer faces
- More visible shadow details
- Reduced digital noise
- Better color balance
- Improved contrast
- Cleaner overall image quality
- A natural look without obvious over-editing
The goal isn’t to make a night photo look like it was taken in daylight. Instead, it’s to preserve the atmosphere while revealing the details that were hidden by low light.
Pro Tips for Better Night Photos with Hypic AI Flash
If you want your edits to look professional instead of heavily filtered, focus on subtle improvements rather than dramatic changes. Small adjustments often produce the most realistic results.
Here are some practical tips that can instantly improve your editing workflow.
Capture the Best Photo Before Editing
AI Flash can enhance a dark image, but it can’t completely fix a photo that’s blurry or out of focus.
Before you start editing:
- Keep your phone as steady as possible.
- Tap the subject to lock focus.
- Avoid digital zoom in low-light conditions.
- Clean your camera lens before taking night photos.
A sharper original image gives AI Flash much better data to work with.
Don’t Rely on AI Flash Alone
Although AI Flash is powerful, combining it with a few manual adjustments usually delivers better results.
For example:
- Lower Highlights to recover bright lights.
- Increase Shadows slightly to reveal hidden details.
- Add a small amount of Contrast for depth.
- Use Sharpness carefully to maintain texture.
This balanced approach creates a natural-looking edit without making the image appear overprocessed.
Compare Before and After
One of the easiest mistakes is continuing to edit without checking your progress.
After every adjustment, switch between the original and edited versions.
Ask yourself:
- Does the image still look realistic?
- Are skin tones natural?
- Have important details been preserved?
- Is the overall mood of the night scene still intact?
If the answer is yes, you’re on the right track.
Save in High Quality
After finishing your edit, export the image using the highest available quality.
Saving at full resolution helps preserve details, especially if you plan to upload your photos to Instagram, TikTok, Pinterest, or print them later.
Avoid repeatedly editing and exporting the same image, as multiple rounds of compression can reduce overall quality.
When You Shouldn’t Use AI Flash
AI Flash is designed for low-light enhancement, but it’s not the right tool for every photo.
You may want to avoid using it in these situations:
Bright Daylight Photos
Daytime images usually have enough natural light. Applying AI Flash may make them look overly bright or flat.
Long-Exposure Photography
If you’re intentionally capturing light trails or artistic night scenes, AI Flash can reduce the dramatic effect by brightening areas that were meant to stay dark.
Silhouette Photos
Silhouettes rely on strong contrast between the subject and the background.
Using AI Flash may reveal details that weaken the artistic look of the image.
Already Well-Exposed Night Photos
If your night photo already has balanced lighting, only minimal adjustments—or none at all—may be needed.
Remember, good editing isn’t about using more tools. It’s about knowing when a photo already looks its best.
Frequently Asked Questions
What is the best AI Flash percentage in Hypic?
For most night photos, an AI Flash intensity between 35% and 55% provides the best balance between brightness and natural-looking results.
Can AI Flash remove image noise?
AI Flash helps reduce visible digital noise while improving brightness, but it can’t completely eliminate heavy grain from extremely dark photos.
Does AI Flash work on selfies?
Yes. AI Flash is especially effective for night selfies because it brightens faces, restores skin details, and improves overall exposure.
Can AI Flash fix blurry photos?
No. AI Flash improves lighting and visibility, but it can’t fully restore details lost due to camera shake or poor focus.
Will AI Flash reduce photo quality?
No. When used in moderation and exported at high quality, AI Flash enhances your image without noticeably reducing its quality.
Should I use AI Flash at 100%?
Generally, no.
Using maximum intensity often creates unnatural lighting, washed-out colors, and an over-edited appearance. Lower settings usually produce more realistic results.
Is AI Flash better than increasing exposure?
They serve different purposes.
Increasing Exposure brightens the entire image evenly, while AI Flash intelligently enhances darker areas, improves facial details, and preserves highlights more effectively.
Can I use AI Flash for indoor photos?
Absolutely. AI Flash works well for restaurants, cafés, parties, concerts, and other indoor environments with limited lighting.
Final Thoughts
Night photography doesn’t have to result in dark, grainy, or unusable images.
With Hypic’s AI Flash tool and the right editing approach, you can recover hidden details, brighten faces, reduce visible noise, and create photos that still look natural.
The key is to avoid pushing every setting to the maximum. Start with a moderate AI Flash intensity, make small adjustments where needed, and compare the original image with your edited version throughout the process.
Remember, the best edits are the ones that enhance the scene without making it obvious that heavy editing was applied.
Whether you’re editing night selfies, city lights, travel photos, or outdoor portraits, these AI Flash settings provide a reliable starting point for achieving clean, balanced, and social-media-ready results.
As Hypic continues to introduce new AI-powered editing features, experimenting with different lighting conditions and subtle refinements will help you develop a workflow that consistently delivers high-quality night photos.